Monday, April 9, 2012

How to tie a Sow Bug - Step by Step instructions

For this post I have decided to demonstrate how to tie a sow bug.
This fly is my go to on the lower Provo River. That and I actually have really good luck using the parachute adams.  The sow bug is relatively easy to tie. I have found that for smaller sized hooks, at least on the lower Provo, that a grey or dark color works best. Then for larger hook I use more tan colors. My suggestion would be to follow these step by step instructions on how to tie a sow but but base the colors used on what works best where you fish.

This step by step tutorial on how to tie a sow bug is from Fly Tying 123. They offer many other tutorials that I use and will probably post more from them later. Now on to the instructions. This step by step instruction using a rainbow pattern and as mentioned earlier I find using grey, tan or black on the Provo River works great.


Material


Hook: scud hook #14-16
Thread: Red 8/0 (as I mentioned I often use grey, tan and black)
Rib: Small gold wire (this color can be changed based on thread and dubbing color)
Center Strip: Black Flashabou
Dubbing: Rainbow Sow-Scud (again I tend to use grey, tan and black colors)

Step-by-Step Instructions


1. Wrap lead on the hook shank

2. Start thread in from of the lead and cover it with the thread

3. Smash the lead flat on the hook to flatten the overall profile of the fly.

4. Tie in the black flash lined up with the top of the hook. Tie in the wire on the far side of the hook.

6. Loosely apply the dubbing to the thread.

7. Dub the entire length of the hook. Be careful not to crowd the eye

8. Pull the black flash directly over the top of the fly and tie off.

9. Wrap the wire four or five times over the dubbing and tie off behind the eye. Be sure to wrap tightly as this will keep the fly intact.

10. Whip finish once, but don't cut the thread.

11. Using velcro, pick the dubbing.

12. While holding the dubbing away from the fly, trim each side 

13. Whip finish once more and apply head cement


There you have it. A step by step tutorial of how to tie a sow bug. Enjoy.

Friday, April 6, 2012

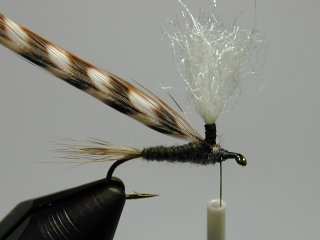
How to tie parachute posts, a Step-by-Step guide

As promised in the previous post. I would include a tutorial on how to tie a parachute post.
I found it took me a few tries to make the post look clean and stable. This is a pretty good step by step tutorial on how to tie a parachute post. In the post on how to tie a parachute adams, the post was made using white antron. I used that when i first started but now that I have more fly tying material I tend to use calf tail.

These step by step instructions on how to tie a parachute post are again by Chris Hatcher from www.questoutdoors.net


Material


white antron, calf tail or substitute.

Step-by-Step Instructions


1. Start the thread and wrap back about 1/3 the shank length

2. Place the post material above the shank and put 2-3 wraps to secure it to the top of the shank. The left over material to the rear can now be trimmed. Since mayfly bodies are tapered, make an angled cut. This will eliminate ta lump of material that would need to be covered later.

3. Make wraps over the material that was left over from trimming and advance the thread in front of the post. Wrap thread in front of the tie in point, building a tapered mount. If done properly this will hold the material upright.
4. Bring the thread up the post by starting at the base and wrapping upwards. Make tight successive wraps up then back down onto the shank. This distance you wrap up the post depends on how much hackle is used.

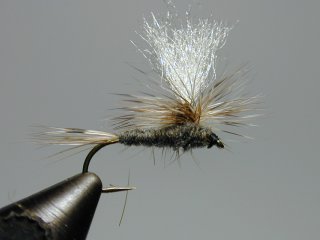
How to tie a Parachute Adams - Step by Step instructions

My second favorite dry fly would have to be the Parachute Adams. This fly works well for a variety of hatches. It almost like a one size fits all t-shirt. It may not imitate any particular hatch but it does cover many mayfly and caddis hatches.


If you have no experience tying a parachute style dry fly, I would recommend starting with a larger size hook.

This tutorial for the Parachute Adams dry fly comes from the Questoutdoors.net and was tied by Chris Hatcher. Another good tutorial for the parachute adams is at americanflyfishing.com. I use that one as a guide occasionally as well.


Material

Hook: TMC 100, #10-18
Thread: Black 8/0
Tail: Brown & Grizzly hackle
Body: Adam's color superfine dubbing
Post: White antron or substitute
Wing: Brown & Grizzly mix

Step-by-Step Instructions

1. Start thread and wrap back to the barb tip

2. Tie in mix of brown and grizzly hackle. Use a stacker to align the tips. Make sure the fibers are all on the top of the hook shank

3. Tie in a post (my next post will be a tutorial on tying a parachute post).

4. Dub body up to post. The length of the post should be the length of the hook gap.

5. Tie in brown & grizzly hackle feathers.

6. Wrap the hackle starting at the top of the thread base on the post and work downward.

7. Ad a little bit of dubbing to the thread to cover the tie in spot and secure the hackle with 3 wraps

8. Tie off and trim any errant hackle fibers. Trim post to look like mayfly wings.

How to do a Matarelli Whip Finish

I struggled performing a whip finish when tying my own flies. Actually I still struggle with it when I haven't tied any flies for a while. The video below is a great instructional video on how to complete the matarelli whip finish. The guy who posted this video does a good job explaining how to properly per form the whip finish. The pace of the video is perfect so you are able to follow along as you watch.


Thursday, April 5, 2012

How to tie a Blue Wing Olive - Step-by-Step Instructions

For my first post, I want to start with how to tie a blue wing olive.

 I love fishing with this fly.  This fly pattern works great here in Utah and from what I understand is fairly common in most rivers. I have had the best of luck using olive, brown and occasionally grey  colored. I really like the pattern below substituting in the colors above.

This fly  comes from jayflies. This fly is simple and it works. It rides fairly low in the water which makes it a versatile fly. Due to the simplicity of this fly it can be easily modified to match many scenarios we might encounter on the river. I usually just change the hackle color and hook size. I would say using a #20. I have done #18. I have tied larger but haven not seen much use for them.

Below is the material and step by step tutorial on how to tie the blue wing olive. Enjoy

Material

Hook: #14-22 dry fly
Thread: 8/0 UNI  
Tail: Dun hackle
Body: Olive blended fur dubbing
Wing: Dun Hackle (underside trimmed flat) 

Step-by-Step Instructions

1. Secure the hook in the vise.

2. Wrap the thread back to the hook bend.

3. Tie in hackle fibers (one hook length) in at the bend.

4. Dub a tapered body.

5. Tie in hackle and loosely dub the thorax.

6. Liberally wrap the hackle forward to creak a thick and buoyant wing.

7. Build a small neat head. Then whip finish and add head cement.

8. Clip the underside of the wing. This allows for the BWO to ride lower. This step can be skipped if oyou want the fly to ride higher.

Thats it. This is the pattern for a BWO that I use the most. Again thanks to jayflies for this pattern. I love it and hope others will too

Fly tying tutorials with step-by-step instructions

I am starting this blog for a couple reasons.

1. I love fly fishing. It has become a huge passion of mine and over the years I have started tying my own flies. I prefer the step by step tutorials found throughout the internet but always have trouble keeping track of which site has a specific pattern. So I plan on posting that information on this blog.

2. I'm sure there are others out there looking for good patterns or prefer step by step instructions. I hope that I can provide tutorials that people will like and can use.

Majority of these posts will not be my material so I will be providing links to the sites. Hopefully this will allow others to find additional fly tying resources but also not appear as though I am stealing someone's posts and claiming them as my own

Feel free to makes requests. I will try my best to locate the pattern and provide a tutorial.